Guide to using GIT with SVN
Introduction to GIT
GIT is a distributed version control system (DVCS). Distributed means is that each user’s working copy is also a repository. It contains the current source files, as you might expect, but also a history of commits, a means to get back to any point in that history and one or several branches. What this allows is for a user to work on, branch and commit code without being connected to a central server.
Tools
To work with GIT you will need the following tools to be installed on your PC:
- MsysGit (includes Git bash shell, Git GUI, gitk) - http://code.google.com/p/msysgit/downloads/list.
- Get the version named Git-{version}.exe.
- Not msysGit-fullinstall-{version}.exe
- And not PortableGit-{version}.7z
- TortoiseGit - http://code.google.com/p/tortoisegit/downloads/list (32-bit version)
MsysGit
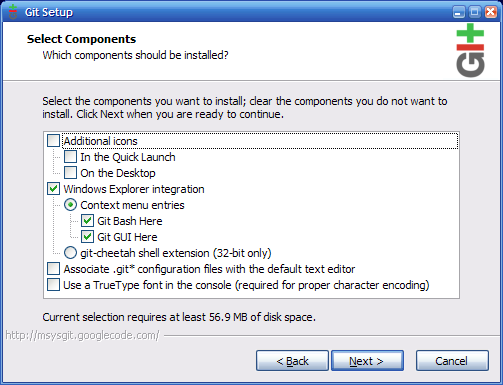
I suggest the following options. Choose these components:
Choose the option ‘Use Git Bash only’:

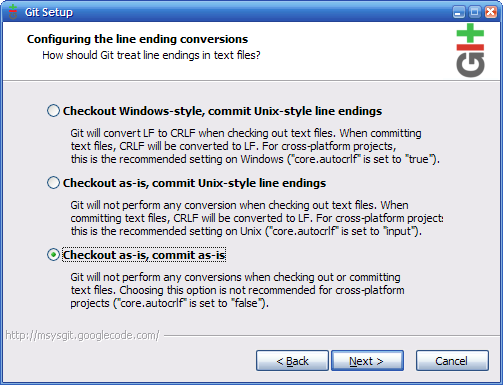
Choose the option ‘Checkout as-is, commit as-is’:
TortoiseGit
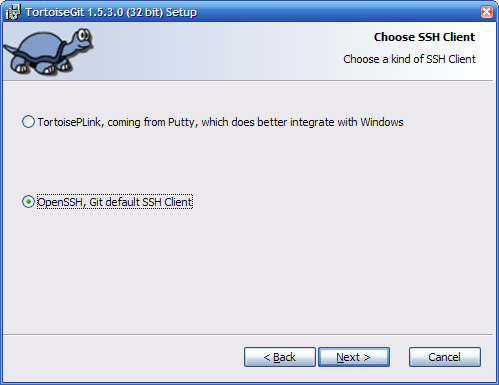
I suggest installing with the following options. Choose OpenSSH client:
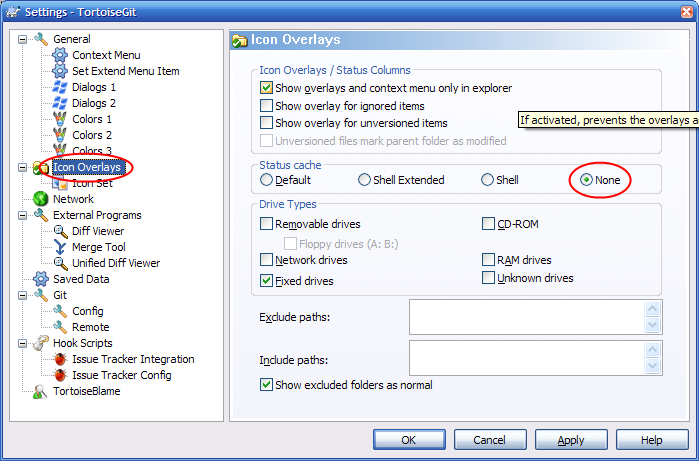
After install, I recommend you disable caching as this can slow your machine down markedly:
.gitconfig
.gitconfig is a file that can be created in you user profile folder (C:\Documents and Settings\username or C:\Users\username). It is a place to put settings that apply to all GIT repositories on your machine.
You should add the following section to your .gitconfig:
[user]
    name = Your full name
    email = Your email address
NB – These settings can also be set/overridden by editing the .git/config file within an individual repository.
These settings can also be updated with Tortoise. From the context menu, click Settings:
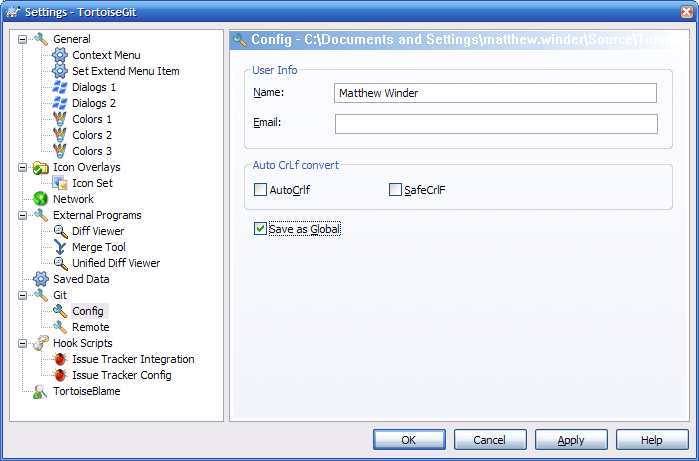
Check the box labeled ‘Save as Global’ to have your changes applied to your .gitconfig file. Leaving the box un-ticked will apply the settings to the repositories .git\config file. It is important that your name and email is set here before you do any work in the repository, so that your commits can be identified.
Administrator role/workflow
This section discusses the tasks that will need to be performed by someone designated as an administrator for the project. On a new development this is likely to be the project leader. If being used privately by a developer to manage their bug fixes this will obviously be done by the developer themselves.
These tasks are divided clearly into three parts: tasks needed to be done to set the repository up initially, tasks that need to be done on a regular basis throughout the lifetime of the repository to keep it in sync with SVN and tasks that need to be done at the end of the project to commit the code back to SVN.
Initial setup
Clone the repository from SVN
When setting up a GIT repository to mirror SVN you have the option of including a full or partial history of commits from the SVN repository. Given that SVN will continue to exist as the definitive source for the foreseeable future, for the use of GIT for new developments and for bug fixing there is probably little benefit in having this history. If migration completely to GIT is your aim then retrieving this history will be of greater importance. Also note that replication of the full history of a large SVN repository will take a considerable amount of time.
NB - It is possible to use command line parameters to maintain branches and tags from the SVN repository as branches in the resultant GIT repo. Here I will only discuss mirroring a single branch from SVN (which could include Trunk).
The following command will setup a GIT repository against the trunk in a folder named “Tutorial”:
git svn clone –r HEAD http://svn-server:port/path/to/Trunk Tutorial
Notice the use of the –r parameter. This specifies the SVN revision number to start the clone from. By passing HEAD to it you are saying that you don’t want any history from SVN. This will result in a repository with a single commit containing the source code as it is in the latest commit to SVN. You can also pass a number to –r which will give you a repository with the revision corresponding to that number and all subsequent revisions. Omitting the –r parameter with given you the full history of the SVN path you specify.
The repository as is stands after the clone will contain the up to date copies of the source tree, and a .git folder. This .git folder is similar in purpose to the .svn folders that get scattered throughout your source tree in an SVN working copy, although here there is only one .git folder located at the root. This .git folder contains the history of the repository and various pieces of meta-data including branches and a pointer to the parent SVN repository.
Setup a baseline branch
The repository is in a state for a developer to work on it, containing all the source code is as you’d expect it to be. It contains a single branch named ‘master’ which you can see from the command prompt, or by executing the command:
git branch
This will list all branches in the repository, with an asterisk next to the current one:
* master
Before making the repository available for other developers to use create a new branch, named ‘svn-baseline’. To do this, execute the ‘svn branch’ command again, this time specifying the name of the new branch (this should be done from within the Tutorial folder):
git branch svn-baseline
After running this command you can see that the new branch has been created by running ‘git branch’ again (notice the new svn-baseline repository has been created but your working copy is still pointing to master):
* master
svn-baseline
The purpose of the svn-baseline branch is to act as a staging point for changes coming in from the parent SVN repository. The master branch meanwhile will be the primary development branch for new commits to the GIT repository. No code should be committed to the svn-baseline branch by developers; it should just be updated with changes from SVN as described in the staying in sync section.
If you are making use of GIT locally that completes the initial setup. If you need to share the repository with the other members of your team, the next step is to make the repository accessible to other developers.
Share the repository
To share the repository with other developers you will need to create what is called a bare repository. A bare repository is a clone of a repository without the working copy. It is not meant for a developer to use, it is intended to be hosted on a server, and play the part of SVN’s central repository.
To create a bare clone of the new repository, change directory back outside of the repository folder (cd ..) and run the following:
git clone --bare Tutorial
This will create a new folder called ‘Tutorial.git’ that is essentially a copy of the .git folder discussed above. This folder can be copied to a network share (or possibly hosted by a GIT server process).
The final step in this process is to add the newly shared repository as a remote in your local repository.
- Add the shared repository as a remote named ‘origin’:
git remote add origin //server/Repos/Tutorial.git - Pull the remote branch references down to your local repository:
git pull - Set the local master branch to track the remote master:
git branch --set-upstream master origin/master - Set the local svn-baseline branch to track the remote svn-baseline:
git branch --set-upstream svn-baseline origin/svn-baseline
That completes the initial setup.
Staying in sync
To keep the GIT repository up to date with changes from the parent SVN repository it is necessary to fetch those changes on a regular basis from SVN. How often you do this will depend on how active development in the SVN repository is, and how much the development in the GIT repository overlaps with things being changed in SVN. It is recommended that this process is done little and often to avoid a large effort less frequently. Experience has shown that if left for weeks or months this task can become a major undertaking. By doing it once every day or two it should just take 5 minutes a time.
Another thing to avoid when working with GIT/SVN is re-factoring or tidying of source files not directly related to the project in question. In particular, moving methods within a class file, changing indentation or any other non-functional code change can cause unnecessary conflicts if the same file is updated in SVN. If it’s clear that the change is needed and can be independently made to SVN favour making it in SVN and allowing it to be merged in using the process described below. Ideally, the new development should minimize its impact on existing files.
The process of keeping the repository in sync is as follows:
- Starting from the working copy of the repository, on your master branch, make sure you’ve committed any code changes to master– changes can be ‘stashed’ and reapplied later if necessary. You should have a clean working copy with no outstanding changes before proceeding – confirm this by running the
git statuscommand and getting the response: ‘nothing to commit (working directory clean)’. - Switch to the svn-baseline branch:
git checkout svn-baseline - Fetch changes from SVN:
git svn rebase - Push these changes up to the server:
git push - Switch back to the master branch:
git checkout master - Merge the changes from svn-baseline into master:
git merge svn-baseline - If there are conflicts resulting from the merge, resolve them.
- Commit the merge and conflict resolution to master:
git commit –a - The vi editor (default) will display a basic commit message which you can accept by typing ‘:q’ and hitting enter.
- Commit the merge and conflict resolution to master:
- If there are no conflicts the merge is committed to master automatically.
- Push these changes to the server:
git push
Committing back to SVN
When the development is ready to be committed to SVN the following process should be followed:
- A final sync with SVN should be performed to ensure the GIT repository is fully up to date.
- Merge master into svn-baseline
- Switch to svn-baseline:
git checkout svn-baseline - Merge changes from master:
git merge master –m "Commit message" - Note: the commit message above should contain the commit message as it should be when it goes into SVN.
- Switch to svn-baseline:
- Commit the combined change to SVN:
git svn dcommit
Developer role/workflow
This section describes the processes that all members of a team, including the administrator, will need to follow. These apply to development using GIT in general, not just when using it with SVN. In fact most of the people on the team can be oblivious of the fact that SVN is being used at all.
You can use GIT locally, without needing to set up a server, to version any folder. To create a new repository using:
git init NameOfRepository
Create a clone
When a user wants to get a copy of the source code they execute the ‘clone’ command. This is equivalent to doing a checkout in SVN:
git clone path/to/repository
git clone //server/Repos/Tutorial.git
NB – When using the git bash included with msysgit, backslashes in network paths will need to be replaced with forward slashes.
A clone can also be made with TortoiseGit.
The resultant cloned repository should be on the master branch and have a remote named origin. Although there will be a “remote branch” named svn-baseline the only local branch should be master. Developers should not be concerned with the svn-baseline branch, and should never commit to it. A useful tool to illustrate this is gitk, which is included in the msysgit package. To use it run ‘gitk’ from within your repository, at the command line. The following screenshot shows the current branch is master, in bold, and that there are 2 remote branches remotes/origin/master and remotes/origin/svn-baseline. It also shows the history of the repository. Later when commits have been made to master the nodes on the left will be arranged in a tree structure a development progresses.
Do some work
Next you would make some code changes – add/edit/delete some files as you normally would. One thing to note is that when renaming, moving or deleting files in a GIT repository, there is no need to do it with a special command or tool like you would in SVN with an ‘SVN Move’ or ‘SVN Rename…’. Instead you can just move, rename or delete the files and GIT will detect these changes (you still need to tell GIT to add new files).
You can check the status of your repository by running the git status command. Or by using the TortoiseGIT ‘Check for modifications’ option.
Committing your work
When you’re ready to commit your changes you should make sure all files are marked as added that should be. A quick way of doing this, assuming all files not under version control should be added, is to run the command ‘git add .’ (notice the dot). Alternatively, you can use the Check for modifications windows to add then (right-click on the file and then click add). Or you can browse to the file itself and then click add from the Tortoise context menu.
Once you prepared your change, commit it using the following command:
git commit –am "commit message here"
Alternatively you can use TortoiseGIT’s Commit -> ‘master’
Share your work
An important difference between GIT and SVN is that the commit operation is a local operation. That is the change you’ve just committed has only committed to your local repository. In order for your changes to be seen by the rest of your team they need to be ‘pushed’ to the server. Before this can be done, however, you must ensure that your local repository is up to date with the share repository. This process is as follows:
- Starting on your master branch
- Ensure that your working copy is clean (git status should return ‘nothing to commit (working directory clean)’ and/or the Check for modifications window should be empty).
- Pull changes down from the server:
git pull - If there are any conflicts you will need to resolve them and commit the resolution:
git commit –aand accept the merge commit message in VI -:q + (Enter). - Push your changes to the server:
git push
More advanced usage: branching, rebasing
Git uses branching implicitly. Each user is developing in their own branch. This becomes clear during the pull/push process above. After which the gitk tool will show the various parallel branches each developer has contributed to the master. More advanced users might want to create a private branch of their own to give more control of the merge process. To do this use the branch command:
git branch private
git checkout private
Where private is the name of the new branch. Or the checkout command with –b switch which automatically switches you to the new branch:
git checkout –b private
A branch in GIT is just a file (in the .git/refs/heads folder) with a reference to a specific commit. Commits are identified by a globally unique hash. This is different to the way SVN identifies commits – it uses an incrementing integer.
You can develop on your new branch and commit to it as you would the master. Assuming master is up to date (you’ve done a recent pull), updates from master can be incorporated by either merging:
git merge master
Or by rebasing:
git rebase master
Rebasing has the advantage that in maintains a linear revision history, but it is a new concept that doesn’t really have a parallel in SVN. It effectively takes the commits you’ve made on your private branch and re-applies them in order on top of master.